Monday, September 29, 2014

Alpaca barn building

Brent and I worked yesterday on the barn for the alpacas.

The last time I posted, I had installed the skirt boards to define the floor of the barn. In doing so, we discovered exactly how much fill we still needed to make the floor level. At that point, I worked with our builder, Rick Robson, to schedule the dirt and gravel work. We also wanted to put as much structure in to support the poles as possible to avoid having the poles shift.

The dirt work was scheduled for last week, but will be done tomorrow (Tuesday) due to rain delays. Brent has finished his work on the flooring in the house and decided to help me yesterday. We also got a hand from my step-dad, Pete. Things go a lot faster with those guys around! We did a lot to prepare the barn for its new floor.

I particularly needed help with cutting the poles to the right heights so that the truss carriers could be installed. It was not a job for me. Not only do power saws scare me in general, but the thought of running a power saw on a ladder seemed way beyond my ability. Being ready to install the truss carriers (and perhaps the roof trusses) next weekend is a very significant step. I was really thankful that Brent found the task relatively simple.
Pete and Brent cutting the tops of poles.
Most of my time was spent getting the wall girts put up. Pete helped a lot with that job. The girts are the boards that will support the metal for the walls. They run horizontally between the poles on 3 sides of the structure. They also are a lot easier and more stable to climb than a ladder - especially since the ground is still uneven.

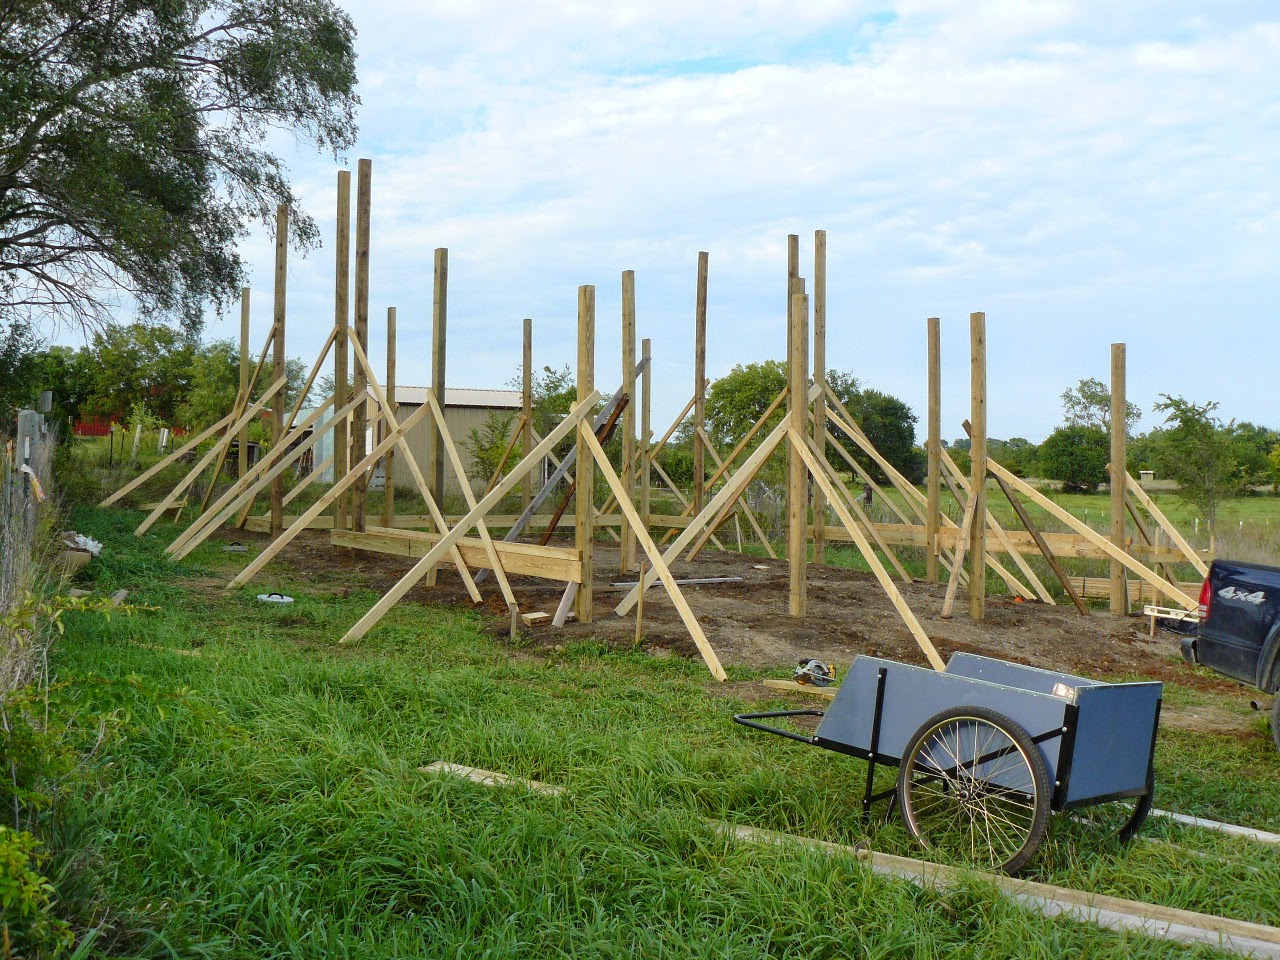
Here's a shot near the end of the day.
Our worksite.

Brent cutting the last pole and using the wall girts as a ladder.
I finished the last row of wall girts right after Brent finished cutting the last pole. The wall girts make the three sides really stable. But the rest of the structure needed temporary bracing to keep things in place. That bracing also creates support for the larger 2X10 truss carriers we will attach at the tops of the poles. Brent also used them to level everything at the top.

Rick and his wife Kelly showed up at the very end of the day and we had an opportunity to chat with them before we cleaned everything up. Brent and Rick exchanged details on the flooring. Rick will be using the same plywood floor planks to make our stair landings.

Rick and Dave will be working on the stairs and trim in the house this week - and the kitchen cabinets are scheduled to be installed this week, too. The garage is full of knotty pine trim, closet doors and wood for shelving.

I can't wait to see what this week brings: a floor for the barn, a kitchen and some trim. It should really start looking like a home. So look for more pictures mid-week.


Monday, September 15, 2014

Barn update

Today I was back at my regular job after a week of vacation to build the barn. Obviously, I didn't finish the barn, but I got the "foundation" done. Amazingly, after all that measuring and double-checking, I still am a half to one inch off on the dimensions. With any luck that won't throw things off too much.

Here's a photo to show where I left off when my vacation ended yesterday:
All 18 poles are set.
After consulting with Rick (the builder of our house), we've decided we need to add more fill dirt before we gravel the floor of the barn. And, since our poles are set only on the concrete "cookie" footing and stabilized with back-filled dirt, we need to add more than the temporary bracing to keep the poles in place before that can happen. To raise and level the site a Bobcat will work inside the "barn" to compress the new dirt and its weight could easily shift the poles. To avoid shifting we will add the skirt boards, wall girts and truss carriers to make things super-stable.

Yesterday I started adding some of the skirt boards. You can see them in the photo. Since this barn is open on one side, there are only skirt boards on 3 sides. Those are all in place. I've also started adding some temporary ones to stabilize the poles on the open, south side of the barn and the poles that support the lean-to covered space that is also on the south side.

Applying the skirt boards made it possible to measure all the poles… and find out that I have a small fix to make. Because the site is still pretty sloped, the holes on the east side were too deep to leave enough pole exposed and I had to fill them a bit with gravel. Unfortunately, I realized that a little too late for one pole and it is now about 6" shorter than it needs to be. It's the only one, though, and we should be able to extend it a little given the way the truss carriers attach.

Ah, hindsight.

Still, so far, I'm feeling pretty good about this first building attempt.


Friday, September 12, 2014

Barn construction and house exterior finishing

I noticed that it's been a long time since I've posted an update and we have made some progress.

There has been a significant shift in the weather since last I posted. It now feels overwhelmingly Autumn-ish. The high yesterday was 62 and today is forecast to be 56. That's over 20 degrees below normal!

Skylr, our 18-year-old son, has been helping me work on setting posts for the barn. Blaine, our 21-year-old, and Jeremy, out 15-year-old, have also lent a hand.

Here are some photos of the progress:

First 6 poles set last weekend - we learned a lot!
This day was definitely still a Summer heat day.

Carrying the 18' poles required 2 people.

Measuring and re-measuring took a significant amount of time.


I actually set 2 poles alone yesterday using an idea Brent had.
The ladder held the pole in place as I filled the hole for 2 of the 12' poles.
Today, I am only one pole short of being done setting the poles. That's my task to complete before the end of the day.

I've learned a ton about construction! Not surprising, since I've never done this before. My biggest learning has been about measuring and using scraps to build "helpers" when you're on your own.

Meanwhile, Rick and Dave made some wonderful progress on the house. The exterior paint is done and they've applied the barn metal to the sun shades. They've also nearly completed the deck and worked on the shower in our master bathroom.

Here are some pictures:
Here's the East side of the house now showing the paint colors, metal awning,
and the deck. This is the view from the barn. Nice!

Dave shoveling the substance that forms the shower floor into the shower.

This is the finished shower floor substrate after Dave formed it. He has also finished the
wall substrate. It's about ready for the tile!

Brent made more progress this week on the flooring. He's actually gotten farther than this.
He has only the small living room area left to do.
I think that about covers it to this point. We are still working. Brent is off work today to continue the flooring job. I will be setting the last post for the barn and starting to measure for the skirt boards. Rick and Dave were off yesterday but should be making more progress today.

Of course, I have also taken time to scope out our crop of morning glory flowers. They came up in the disturbed dirt in the pasture over the septic system lateral field. But I won't bore you with those - just wish me luck in gathering seeds or transplants. We have at least 3 different colors - all beautiful!

More to come :-)


Monday, September 1, 2014

Alpaca barn and plywood flooring

Brent and I spent our Labor Day weekend building muscles. Brent putting together the planks he milled from salvaged material for our main level floor and Skylr and I starting the work on the barn for the alpacas.

Brent discovered that what seemed like a small part of the job was actually quite time-consuming. The dominos that are used to create the strong and very level joints between the planks take a long time to insert and glue into the boards. He felt like that was taking the majority of the time assembling the floor.

So, after a slow start, today he was able to hire our eldest son to help and the job went faster. Here's a picture of their progress.
Brent (left) and Blaine installing plywood flooring.
The floor is going to be beautiful. I will love showing it off and telling everyone how Brent engineered it from scrap wood. I know it will make a pretty floor, but even better, its story will be interesting. It's been hard work for Brent but worth it to save some beautiful material from rotting in a landfill.

I think it's going really well. The schedule is pretty tight. But he has a week and, as he's learned a system for installation with the first days, I imagine the next days will continue to be more and more productive.

For my part, after spending many hours over the last weekend trying to layout the barn on it's leveled site, it was clear I needed to have a hand with my project. So our next to youngest, Skylr, agreed to make a little money over the weekend helping me.

Together, after I found some instructions on another barn kit company's website, we managed to make the barn layout square. Here's how it looked when we finished the layout:
View of southwest corner of barn site - orange spots are pole placement.
Sunday we rented a pull-behind gas-powered auger with a 16" bit for drilling the holes for the posts. I was under the mistaken impression that it was hydraulic. It wasn't but it certainly appeared big enough to me.
Rented auger from Home Depot
The handle near the auger bit was at about 4 feet high - about chest height for me. Unfortunately we need the holes to be 4 feet deep. I didn't realize when I saw this bit that it would only go about 3 feet deep.

Skylr and I worked very hard running that machine for 5-6 hours on Sunday. Neither of us is very tall so it wasn't easy to hold on to this spinning metal bit and also apply downward pressure while it attempted to chop through tree roots and break up rocks. It just did not want to stay where we put it. Instead it would run all over the top of the ground. Rather than digging the bit seemed intent on chasing off the brave person holding it by threatening to eat their feet! 

Amazingly, we finally got one hole as deep as the bit and the handle would go. We measured for accurate placement on our line when we'd reached a depth of 1 1/2 feet and found we were not close enough to our mark to place the post correctly. So we fought to adjust one edge of the hole and used shovels to widen the opening in the needed area. After more drilling we thought we might be getting the hang of it. As the handle finally reached the ground and the bid was as deep as it could go, we measured again to discover the hole was only 3 feet deep. Hmmm. That's when I realized we couldn't get this job done with this equipment.

Trying to make the best of our rental time, I decided to try and make another hole. At least we could get most of the way to the 4 foot depth, right? But this time the bit wouldn't bite into the ground at all. After fighting with it for what seemed a terribly long time, we measured. It had only gotten us one foot deep. And the ground looked shiny-slick like hardpan clay.

This is where we ended:
One 3' hole and one 1' hole in around 5 hours
The barn will have 18 posts. It was painfully (literally, physical pain and blisters) obvious that we did not have the right equipment for this part of the job. So we hooked up the auger to the truck and decided to work on cleaning up.

And on top of that beating to my pride and old muscles our canopy that we used for shade was destroyed by the wind. We had found these great concrete plugs with handles from the tops of the cisterns that were perfect for anchoring the portable canopy on this windy day. Tied to those plugs the wind just caught the cover. The constant movement of the top twisted the metal legs until they broke. The legs did not come off of those concrete plugs, though. So those plugs were the right equipment :-)

See, at least one thing I did was right. Just kidding, there were some other positives, I think.

I continued to pay Skylr today (Labor Day). He helped me place the stakes for the new fence along the draw. It went a lot faster with him on the other end of the tape to mark the 50' distance between the posts and help find a straight line. I am very happy with it. The fence will follow the draw so from the north side of the property it travels relatively straight south. Then at about halfway across the pasture it takes a 45-ish degree turn to the west until it hits the south side of the property. The fence will have 2 large gates: one for accessing the crossing to the back pasture; the other for accessing the area intended for the pond. So, when I find the person with the hydraulic auger to drill the holes, they will all be marked and ready. 

I wonder how long it will take the right equipment to drill 18 holes for the barn and 14 more for the fence. Eight hours? Ten? And how much will that cost? Whatever it is, I think it will be worth it. 

Dang, nothing like digging a really deep hole in very hard earth to make you feel… appreciative of someone else's tractor? (I'm trying to find a positive because I slid back into the negative.)

Next week, exterior house paint!


Tuesday, August 26, 2014

Sanding, deck posts and barn kit

As Labor Day weekend approaches, Brent and I are excited to see significant progress towards finishing up the house.

The sheetrock has had it's finishing coat of mud, ceiling texture and was sanded. Here's how it looked when the crew finished sanding yesterday.
Finished sheetrock, Southeast corner from front door.

Finished sheetrock, North wall of kitchen.
While the sheetrock crews were doing their work inside, Rick and Dave were working outside. On the day that seemed to be the hottest of the whole year (not officially, just my opinion!), they were continuing their work setting the large cedar posts for the deck. And, of course, to make matters worse the deck is on the south side of the house. Here's a picture of their work yesterday.
Cedar posts for the deck.
And finally, I took the day off from work yesterday to accept a huge delivery…my barn kit! It came on a big blue truck :-)
Truck delivering the alpaca barn to the pasture.
John, the driver, didn't have any trouble pulling the truck into the driveway and had plenty of space to turn the truck around in the pasture. Unfortunately, the lift that he uses to unload the materials malfunctioned before he could get everything off the truck. So, with the help of Rick and Dave, we unloaded the poles and concrete "cookie" footings by hand. The little forklift is sitting in the pasture until a repairman can be scheduled to fix it.

Meanwhile, I am still working to get the barn building site staked out. I have a lot to learn about how to do that efficiently. Getting everything square is incredibly challenging. It has taken me about 5 hours! But I'm close. So, with a little more work, I will be ready to rent an augur to dig the post holes next weekend. It's pretty discouraging how little visible progress all that time and effort produces. Here's a picture:
Leveled and staked building site for the barn.
I'm sure it will look more barn-like next week :-)

Monday, August 18, 2014

Retaining walls are done

Last weekend our hard-working "rock guy" finished placing all the rocks for the retaining walls. They look beautiful and I will love creating gardens around them.

We've taken photos along the way, but here are some of the areas that were finished this weekend.
Steps leading up to the Summer Kitchen on the east side of the house

Short retaining walls on the west side
Last weekend also saw a new crew that worked on completing another step in the sheetrock installation. They applied the tape and corners. Here's how it looked when they were done.
Shelves near west window in Master Bedroom
Corner and top of the Coat Closet near the entry
This week should see finishing of the sheetrock. And, while that is happening other outdoor work can start now that the retaining walls are done. Brent and I will have 2 palettes of smaller stones delivered to finish off the retaining wall around the maple tree near the front porch. That needs to happen before the final grade can be started.

In addition, I am prepping for the delivery of the pole barn kit we purchased to house our little herd of alpacas. The posts for the fence near the draw were delivered on Saturday and I got word that the kit for the barn will arrive at the property on Monday the 25th. That's a week or two earlier than I thought!

Greg Wheeler, the "rock guy," will be focused on leveling the building site for our barn now. It will, hopefully, be a small job for him before he takes his much-needed and deserved vacation in September.

Things are progressing very quickly now. We are excited and exhausted...and happy :-) 

Friday, August 15, 2014

Insulation, sheetrock, a birthday and a new school

The first 2 weeks of August have been action-packed. So much so, that it's hard to know how to start to explain. Everything is a process and the multitude of processes in motion at the same time has us jumping from one thing to the next before we can take a breath.

I will start with our new home which continues to take shape in spite of the oddly rainy weather. The HVAC work was completed, so insulation work was done. And even that wasn't a one-step thing…
First the batts and, in other places, sheets of insulation
for the roof and ceilings.
Next a layer of plastic sheeting to form an infiltration barrier.
Then caulk (white substance in the plastic and orange around the wires and tubes)
 to really make sure it's sealed.
 After the insulation, any soffits or build-outs for securing the sheet rock were added.
Soffits were built to conceal the HVAC units in the lower level.
On Tuesday, the sheetrock was delivered. And Wednesday the crew began hanging.
Wednesday sheetrock starts.
 And by end of day on Thursday they have everything covered and things suddenly look much cleaner!
Sheetrock is hung.
While the sheetrock was in the works on Wednesday and Thursday our son Jeremy also started his sophomore year at his new school, Basehor-Linwood High School. Until we move into our new home, we will drive him up to school in the mornings. After school he takes a bus to the farm and waits until we leave work to pick him up. Rick, our builder, jokes that the sheetrock crew that does the mudding will be moving so fast that we won't need to worry about Jeremy getting in the way. They will just mud right over him :-)

And, to top it all off, Brent turned 50 last weekend. My plan was to have a big celebration that would also be an open house. But, plans are known for changing. Rather than a big celebration, we had a small one with all of the boys and Kristin. I did manage to have the party it at the house, though.
Brent's 50th birthday dinner in the garage at the farm.
It poured down rain nearly all afternoon. So we took shelter in the garage most of the day. I cooked steaks on a little charcoal grill in the rain with help from Skylr, Jeremy and Blaine while Kristin and Brent finished insulating the Summer Kitchen. Doogle was even on hand to clean up any messes. It was good to have everyone together.

Of course, that isn't all that's happened in the last 2 weeks. There was STAGES camp at the Lyric Opera for Jeremy, multiple Shawnee house showings occurred, Skylr flew to California for a visit with his dad, tile for the bathrooms was selected, bathroom cabinets were purchased, a new roof for the Shawnee house was scheduled, and Brent and I worked our day-jobs to name just a few of the other things.

Whew! Like I said, there has been very little time to take a breath. 

But we are thrilled to see things moving again. It's gradually looking more like a house and less like a construction site. And seeing these pictures makes me smile because I know it won't be long before we can finally call Happy Apple's Farm our home :-)