Tuesday, June 29, 2010

Native prairie planting near the pond

Doesn't this look pitiful? Well, it's just the beginning; give it time. I wanted to show this photo as a placeholder of sorts. This will give me a benchmark for how this area looked when first planted. We'll all get to judge my garden design "vision." All the plants in this area are natives. Most were in the cartful of plants I purchased at Critsite's Prairie and Wetlands center. Many others were purchased at Heartland Nursery in Lee's Summit and a few at my favorite local garden center, Colonial Nursery. I'll highlight plants as they bloom rather than list all of them here now. I'm keeping my receipts which list the genus and species as well as the tags that came with each plant for future reference.

Hard to see in this photo is a bare spot toward the back of this planting. That will be filled with purple coneflower and Rudbeckia growing in gardens in the backyard. In the case of the coneflowers, I should say "overtaking" the island garden in the back. More about that project in another post.

For now, we'll just call this area the prairie garden. And this photo will help me remember how it looked in the beginning. The ground beneath this mulch is compacted from equipment and people traveling across this area while it was mud during our very wet spring. It will be interesting to see how well these plants fare given my hasty planting techniques and, for the most part, lack of soil amendments. At this point these plants have been in the ground for approximately 2 weeks. Almost all of them still look fairly healthy. I'm keeping my fingers crossed :-)

The pond's prettiness

The pond is done. It's just maintenance now. This photo was taken early in the morning from my front door stoop. Even in this beginning state, I think it looks pretty. The plants tucked in the rocks outside of the pond that I mentioned in my last post will hide a lot of the gaps and unnatural looking edges. So I think it will just get better. You can see the green wire fence I put up to keep the dogs out of the bog and off the rocks while the plants get established. With any luck they will quickly find a route they like to the pond's edge and forget they can walk on the gravel in the bog. Lucky for me the wire doesn't obscure much of the view and barely shows up in photos :-)

Monday, June 21, 2010

Update on pond planting

Here's a snapshot of some of the planting I've been doing. Might be hard to see here, but the gaps in the rocks are filled with gravel and dirt.

Tucked into those areas are sedum and Fame Flower (Talinum calycinum). I tried to photograph the intense magenta flowers with yellow-gold stamens that float on almost imperceptible stems in the evening above the Fame Flower. My camera must be intensity-avoidant because it just refused to focus. But you can see the little succulent leaves protruding from the rocks.

Planted at the bottom on the rocks in this photo are Butterfly Milkweed (Asclepias tuberosa) and Missouri Evening Primrose (Oenothera macrocarpa). These are planted on the east side. There are more planted along the south side of the pond.

Where the pond intersects the waterfall (not shown in the photo), I've planted Purple Poppy Mallow (Callirhoe involucrata ) and Bush's Poppy Mallow (Callirhoe bushii). The purple poppy mallow will trail. So I've planted one of them in a large crevice in the rocks around the pond. It should look pretty trailing over the side.

If all survive, it will be beautiful. I'll have to keep a close eye on things as they become established. If I haven't secured the soil in those rocks well enough, it's likely to wash out. It would be a shame to see those little fame flowers wither!

More daylily gorgeousness

I have no idea what variety these are and I don't really care. They are beautiful. The peach colored flower in the foreground has a yellow center. It's intensity makes the whole flower glow. It captivated me for several minutes before I noticed the pretty yellow flower in the background.

I'm spending so much time in the front yard with the pond that this area near the vegetable garden is hardly noticed. But when I notice, I'm always delighted with the loveliness I've been given :-)

Wednesday, June 16, 2010

Just passing along a very cool map

Garden Rant, one of the blogs I follow, discovered this cool land cover map. Check it out.
Here's a link to the map:
Landcover Map

Here's a link to the Garden Rant post about it:
Garden Rant

Monday, June 14, 2010

Daylily fun

Last week I noticed some color peeking through the weeds around the vegetable garden and found this beautiful daylily blooming. Now I'm excited to see several others nearby that will also bloom soon.

Here is another pretty variety blooming beneath the burr oak at the south east edge of the vegetable garden.
I thought, based on this planting along the walk to the front door, that all the lilies in my new yard might be Stella d'Oro. They're beautiful grouped in such a large number, but it's nice to see some other varieties have been planted. I guess I shouldn't be surprised knowing the previous owners loved gardens - just impressed at their choices - and thankful :-)

Sunday, June 13, 2010

My kind of shopping!

I took a trip on Friday to CritSite's Prairie and Wetland Center just south of Kansas City in Belton. The day started out misty and threatening rain, but ended up very muggy as the sun broke through the clouds.

The Prairie and Wetland Center was my kind of place: all overgrown and full of growing things. I loved it. Here are a couple of photos of their selection area and display.
These tables are full of perennials. The low plants in the background in pink pots are Fame Flower (Talinum calycinum). I bought two pots. They grow on rocks and they're pretty. How could I not?

This photo shows a corner of one of their displays. It reminded me that I wanted some Prairie Dock (Silphium terebinthinaceum). All of the displays were lovely and informative, showing great combinations and preferred location.


And this was my cart as I prepared to check out. It wasn't cheap. I paid over $200 for that cartful, but it was fun and I found most of what I wanted.

After we left the CritSite's Prairie and Wetland center we visited Heartland Nursery. I was impressed with their selection of native plants. I found a few that I couldn't get at the Prairie and Wetland center because they were still in production and not ready for sale yet. I even found an Elderberry (Sambucus nigra). I hadn't planned to purchase that since it isn't going in the area around the pond, but I didn't want to pass it up. What if I couldn't find one? The only plant I'm still missing is Butterfly Milkweed :-(


And this is the space my new purchases will fill - at least in part. That big pile of mulch is at the left edge of the area that will receive sun the majority of the day. The grasses, goldenrod, rattlesnake master, blazing stars, wild bergamot, penstemons, prairie dock, and at least one or two others that I can't remember will, with any luck, make a nice little prairie/meadow just outside my front door.

The other plants I purchased will soften the edge between the gravel path and the pond. Others, like the fame flower, will be placed in the rocks that edge the pond. And the American Beautyberry and Summersweet bushes will fill space near the waterfall.

Shortly after this photo was taken we had a huge rain and flash flooding. So not much was planted, but between thunderstorms I did spread all the mulch, getting nearly all the mud covered. And my new purchases won't suffer from lack of water :-)

Thursday, June 10, 2010

Pond progression photos

Just for fun, I want to show the progression of the pond from beginning to where I left off last weekend.

 Shelves have been dug all around the edge, including the large shelf that will house the gravel bog filter.

Foundation for the partition wall of the bog filter is in place and I've begun creating the level edge for the pond.

Edge of pond is level and I've begun to place underlayment (carpet pad in this case) in the bottom of the pond to protect the liner from all the tree roots.

I've finished placing the underlayment and I'm ready to place the 45 mil. rubber pond liner.

Here is the pond liner in place and it's been filling for about 1 1/2 hours, reaching the 12" deep shelf for the bog filter.

I shifted viewpoints here and we're now looking from the other end of the pond. And as you can see it's nearly full. At this point we estimated based on how long it took to fill the 5 gallon white bucket in this photo that the pond is holding around 1200 gallons.

There's a big gap here in the photos. I installed the pump and plumbing including valves to adjust flow to the waterfall and bog filter. I used 1 1/4" flexible hose to go from the pump to the "T" and then to the ball valves. From the valves flexible hose takes water to the 2" PVC pipe to feed the bog filter and to the waterfall. Then, I was very busy moving cinder blocks for the wall that partitions the bog from the rest of the pond and shoveling two pickup loads of gravel into the bog. I also purchased plants for the bog and planted them.

After all that, here's what I had. You can see that the water level has risen to nearly overflow the edge due to displacement from the gravel and cinderblocks. The water is also very cloudy from the gravel. You can't even see the gravel just under the water and the plants.

In this photo the waterfall has been "roughed-in." It's just cinderblocks, liner, and the rocks creating the "splashy" sound that I like so much. The water is clearing up a little, but it hasn't receeded or evaporated much.

There's another pretty significant gap here. I am moving literally tons of rocks to cover the edges of the pond and waterfall as well as to form a path around two sides of the pond.

And this is how the pond looked last time I posted. The waterfall is now covered with rocks, the edge of the pond is completely concealed, and the gravel path around two sides is in place. You can see the gravel in the bog filter now that the water has evaporated a little.

I still haven't spread the mulch, but another weekend will be here before I know it :-)

Tuesday, June 8, 2010

Pond photo

Here it is!

The only thing not done in this photo is spreading that big pile of mulch. But that doesn't really affect the pond. I took this photo Sunday evening before calling it quits for the weekend. The reflection on the water makes it a little hard to see details so I'll explain.

This view is from the front door stoop. The gravel bog filter is the area at the close end of the pond that contains plants and doesn't look as though it has any water. The rocky lump at the far end of the pond, between the wheel barrel and the pile of mulch, is the waterfall.


More plants are needed around the edges of the pond. You can see one that I've placed near the waterfall. It came from my old, small pond and survived the winter in a shallow pan of water. There is a waterlily in the far right corner that purchased a week ago and a clump of water hyacinth floating in the center to provide a little shade for my gold fish. The majority of the plants I've purchased so far are in the bog filter. There is a water canna, cardinal flower, bog bean, two Louisiana water iris, a variegated sweet flag, two pickerel rushes, a taro (annual), something called a water wisteria, and two blue rushes. You may notice a small pot sitting in the gravel. That's a chocolate mint that my uncle gave me. I've heard it will grow in the pond, but that it's pretty aggressive. So I'll put it in a pot. There is also a plant with small yellow flowers in the bog that I pulled out of a puddle in a gravel parking lot the other day. It looks like a buttercup. I'll check it out and let you know.

It all seems to be working well. Most of the plants have been in the pond for over a week and they all appear to be growing. The water canna and the pickerel are blooming. The gold fish from my old pond that lived in the aquarium downstairs all winter were moved into the pond on Friday. They look healthy and happy.

Yay! And I still love the splashy sound of the waterfall.

Tuesday, June 1, 2010

I've been lost in the world of water gardening

Whew! That long weekend lasted too long. Placing 3 tons of rock and 1 1/2 tons of gravel in a pond is hard work. Not only that, but it leaves no time for writing about the progress on my pond.

I'll take a little time today to share how the project is progressing. No pictures to show yet since it isn't quite finished. Incredibly, I ran out of rock. So the top of the waterfall isn't covered and more flat rocks are needed to clean up the pond edge.

Three tons might sound like a lot, but there never seems to be the right rock for the spot. I just called today to have 2 more pallets delivered. That should more than finish things up.

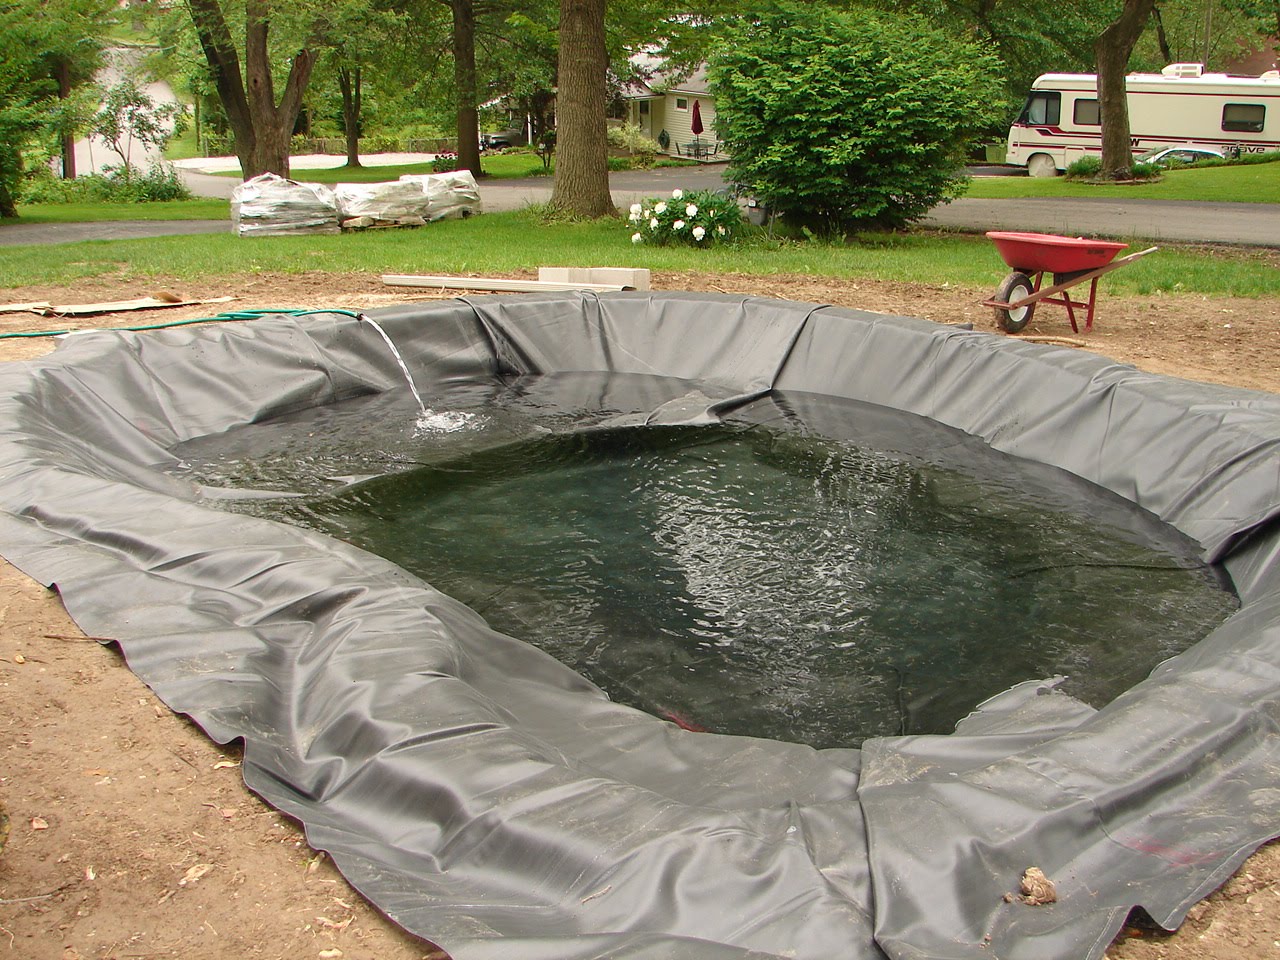
Last time I wrote about the pond it had a liner and was being filled with water and now it is full and has a splashy waterfall :-) I wish I could share a recording. It reminds me of the relaxation tapes I used to have. Think small splashes in a babbling brook.

The plumbing and gravel bog filter are finished, too. The plumbing came together very well. The pipe that feeds the bog filter was easy, but putting together the fittings for the two ball valves to regulate the flow from the pump to the waterfall and bog was very tough. The flexible hose just didn't want to slide onto the barbs. But I got it done with lots of cursing and sweat - and it works, hence the splashy waterfall.

After covering the pipe in the bog with 1/2 ton of gravel, I purchased plants and another 3/4 tons of gravel. My guide to bog filter construction suggested placing the plants after filling the bog halfway with gravel. But I found it very difficult to shovel gravel in around the plants without damaging them. So I added gravel to about one inch below the water level and then placed the plants. The last inch of gravel I added by hand. So it's now a very good thing that I don't care how my fingernails look - because I have none.

I also jump-started my bog's biological filter by adding Microbe-lift to the water. It's some bacteria-mix stuff that my neighbor suggested. He has a very clean pond with huge, happy koi so I think he knows what makes a healthy pond. In addition, as a precaution, I added a water treatment to remove chlorine since I filled the pond with water from the house. It was probably okay since the water had been sitting for a week, but just in case.

The pond water was really murky due to sediment on the gravel and I was nervous about putting my 3-year-old. Laura at Brother's Pets where I purchase the Microbe-lift suggested I buy some feeder goldfish to test the water and start things off. Nine of the dozen I bought seem to have survived. The bodies of the other 3 haven't surfaced. They may still be there, too. The goldfish I am nervous about putting in the pond were also feeder fish (actually bait from the bait shop), but they are getting pretty big. It's a lot easier to dispose of a small fish body.

The water was pretty clear yesterday morning and I could see all the way to the bottom. Still didn't see the missing goldfish, but I think the filter is working.

Last night I finally took time to work at my desk in the sunroom and enjoy the new view of the waterfall. But I'll have to adjust to the restful sound. It's hard to stay focused on balancing the checkbook with that lovely distraction in my ears dragging my eyes from their task.

Ah, the troubles I endure :-)